Webhooks
Webhooks allow you to integrate Testkube with external systems by sending HTTP POST payloads containing information about Testkube executions and their current state when specific events occur. To set up webhooks in Testkube, you'll need to have an HTTPS endpoint to receive the events and a payload template to be sent along with the data.
As of Testkube 2.7.0, you need a Webhook Agent in your Testkube Environment to emit CDEvents - Read More
Please visit our Blog, Empowering Kubernetes Tests with Webhooks for a tutorial on setting up webhooks for Slack and Grafana Dashboard.
Benefits of using Webhooks in Testkube
Testkube uses webhooks to integrate with external systems, allowing you to effortlessly synchronize your testing workflows with other tools and platforms. These webhooks are designed to carry critical information regarding your tests as HTTP POST payloads. The information can include the execution and real-time status depending on how you configure it.
To leverage webhooks, you need to ensure that the platform that you want to send information to has an HTTPS endpoint to receive the events. Testkube also allows you to customize the payloads.
You can create a webhook from the dashboard, use the CLI, or create it as a custom resource. Before we show how it’s done, let’s understand a few scenarios where Webhooks in Testkube shine:
-
Incident Management & Response: Webhooks can be used to create incidents and alert on-call teams when a critical test fails. This ensures a timely response and avoids any potential disruption due to failures and bugs. With Testkube, you can configure incident management tools like PagerDuty and OpsGenie to receive alerts based on critical events for your tests.
-
Communication and Collaboration: You can configure Webhooks in Testkube to send alerts to your teams in your communication tool. This will notify your team of any critical event that needs attention and attend to it before the issue escalates. Some of the popular communications tools like Slack and MS Teams can be configured to receive alerts from Testkube.
-
Monitoring and Observability: Webhooks can also be used to send alerts and notifications to your monitoring and observability tools like Prometheus and Grafana. This provides visibility into your tests, alerts you, and ensures that timely corrective actions can be taken.
Creating a Webhook
The webhook can be created using the Dashboard, CLI, or a Custom Resource.
- Dashboard
- CLI
- Custom Resource
The Testkube Dashboard allows you to create Webhooks interactively from the Integrations / Webhooks tab - Read More:

Webhooks can be created with Testkube CLI using the create webhook command.
testkube create webhook --name example-webhook --events start-testworkflow --events end-testworkflow-success --events end-testworkflow-failed --uri <YOUR_ENDPOINT_URL>
--name- Your webhook name (in this caseexample-webhook).--events- Event that will trigger a webhook. Multiple--eventscan be defined (in this case--events start-testworkflow --events end-testworkflow-success --events end-testworkflow-failed). All available trigger events can be found in the Supported Event types section.--uri- The HTTPS endpoint where you want to receive the webhook events.
apiVersion: executor.testkube.io/v1
kind: Webhook
metadata:
  name: example-webhook
  namespace: testkube
spec:
  uri: <YOUR_ENDPOINT_URL>
  events:
    - start-testworkflow
    - end-testworkflow-success
    - end-testworkflow-failed
  selector: ""
Where <YOUR_ENDPOINT_URL> should be replaced with the HTTPS endpoint URL where you want to receive the webhook events.
And then apply with:
kubectl apply -f webhook.yaml
Resource Selector (labels)
In order to limit webhook triggers to a specific resource, or resources, the Resource Selector can be used. It allows you to select the specific resource by label, or labels.
- Dashboard
- CLI
- Custom Resource
In the Dashboard - Read More.

The Resource Selector can be set with --selector.
For example, --selector test-type=postman-collection will limit the resources to the postman tests (label: test-type=postman-collection)
spec:
  selector: test-type=postman-collection
So, the complete definition may look like this:
apiVersion: executor.testkube.io/v1
kind: Webhook
metadata:
  name: example-webhook
  namespace: testkube
spec:
  uri: <YOUR_ENDPOINT_URL>
  events:
    - start-testworkflow
    - end-testworkflow-success
    - end-testworkflow-failed
  selector: test-type=postman-collection
Webhook Payload
Webhook payload can be configured - in this example, event id:
{"text": "event id {{ .Id }}"}
- Dashboard
- CLI
- Custom Resource
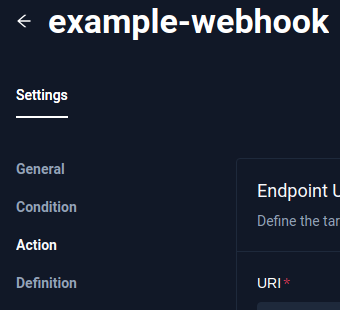
When you have selected an existing Webhook, its payload can be configured in Webhook Settings/Action tab - Read More

Create a webhook payload template file:
{
  "text": "event id {{ .Id }}"
}
And set it with --payload-template template.json.
testkube create webhook --name example-webhook --events start-testworkflow --events end-testworkflow-passed --events end-testworkflow-failed --payload-template template.json --uri <YOUR_ENDPOINT_URL>
Where <YOUR_ENDPOINT_URL> should be replaced with the HTTPS endpoint URL where you want to receive the webhook events.
Webhook created example-webhook 🥇
Payload template can be configured with spec.payloadTemplate.
  payloadTemplate: |
    {"text": "event id {{ .Id }}"}
Example:
apiVersion: executor.testkube.io/v1
kind: Webhook
metadata:
  name: example-webhook
  namespace: testkube
spec:
  uri: <YOUR_ENDPOINT_URL>
  events:
    - start-testworkflow
    - end-testworkflow-success
    - end-testworkflow-failed
  selector: ""
  payloadObjectField: ""
  payloadTemplate: |
    {"text": "event id {{ .Id }}"}
Webhook Payload Variables
Webhook payload can contain event-specific variables - they will be replaced with actual data when the events occurs. In the above examples, only the event Id is being sent.
However, any of these supported Event Variables can be used.
For example, the following payload:
{"text": "Event {{ .Type_ }} - Test '{{ .TestWorkflowExecution.TestName }}' execution ({{ .TestWorkflowExecution.Number }}) finished with '{{ .TestWorkflowExecution.ExecutionResult.Status }}' status"}
will result in:
{"text": "Event end-testworkflow-success - Test 'postman-executor-smoke' execution (948) finished with 'passed' status"}
Helper methods
We also provide special helper methods to use in the webhook template:
testworkflowstatustostringis the method to convert a pointer to a test workflow status to a string type.
Usage example:
  - name: TEXT_COLOUR
    value: {{ if eq (.TestWorkflowExecution.Result.Status | testworkflowstatustostring ) "passed" }}"00FF00"{{ else }}"FF0000"{{ end }}
You can use Sprig golang template functions if you need to have some special logic in your templates. You can find a full list of them here
Using Agent Environment Variables in Webhooks
In addition to event-specific variables, it's possible to use environment variables from the Agent API server (on agents with the Webhook capability) in your webhook payloads and configurations. This feature is particularly useful for including sensitive information like API keys or URIs without exposing them in your webhook definitions.
Configuring Agent Environment Variables
To set up extra environment variables for the Agent API Server, you can use the testkube-api.extraEnvVars field in your Helm chart configuration.
This allows you to define environment variables, including those that reference Kubernetes secrets:
testkube-api:
  extraEnvVars:
    - name: "SLACK_WEBHOOK_URI"
      valueFrom:
        secretKeyRef:
          name: my-secret
          key: slack-uri
Using Environment Variables in Webhook Payloads
Once configured, you can access these environment variables in your webhook payload templates using the .Envs object:
{{ index .Envs "SLACK_WEBHOOK_URI" }}
For example:
TESTKUBE_PRO_URL: {{ index .Envs "TESTKUBE_PRO_URL" }}
Using Environment Variables in Webhook URIs
You can also use environment variables to set the webhook URI itself, allowing you to keep sensitive URIs out of your version control:
apiVersion: executor.testkube.io/v1
kind: Webhook
metadata:
  name: slack-notification
  namespace: testkube
spec:
  # ...
  uri: '{{ index .Envs "SLACK_WEBHOOK_URI" }}'
  # ...
Make sure to double-escape brackets when specifying values that themselves specify template syntax.
Using Config and Parameters to specify Webhook variables
If you want to specify variables to use inside of Webhook fields, you can specify config section.
They can be defined in the Webhook specification or taken from the Kubernetes secret.
You can reference them using builtin Config dictionary and golang template expression:
apiVersion: executor.testkube.io/v1
kind: Webhook
metadata:
  name: webhook-jira
  namespace: testkube
spec:
  config:
    priority:
      value: "5"
    token:
      secret:
        name: somevars
        key: apitoken
  events:
  - end-testworkflow-success
  uri: https://webhook.site
  payloadTemplate: "Priority: {{ index .Config "priority" }}"
  headers:
    Authorization: "Basic {{ index .Config \"token\" }}"
If you want to validate your config variables before executing a webhook, you can specify parameters section.
spec:
  parameters:
    - name: priority
      description: priority id variable
      required: false
      example: "3"
      default: "3"
      pattern: "^[0-9]*$"
URI and HTTP Headers
You can add additional HTTP headers like Authorization or x-api-key to have a secret token.
It's possible to use a Golang based template string as the header or URI value.
- Dashboard
- CLI
- Custom Resource
Webhook headers can be configured in Webhook Settings->Action.
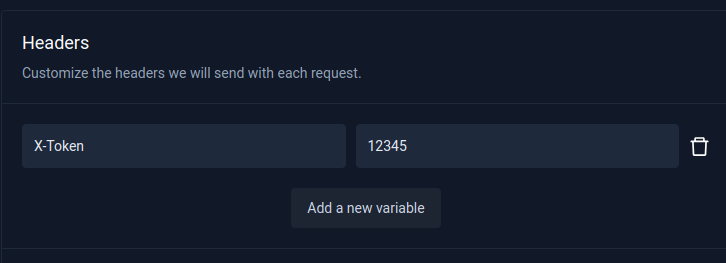
Custom headers can be set using --header - for example:
--header X-Token="12345"
spec:
  headers:
    X-Token: "12345"
apiVersion: executor.testkube.io/v1
kind: Webhook
metadata:
  name: example-webhook
  namespace: testkube
spec:
  uri: <YOUR_ENDPOINT_URL>
  events:
    - start-testworkflow
    - end-testworkflow-success
    - end-testworkflow-failed
  selector: ""
  headers:
    X-Token: "12345"
Supported Event types
Webhooks can be triggered on any of the following events:
Workflow Events
- queue-testworkflow
- start-testworkflow
- end-testworkflow-success
- end-testworkflow-failed
- end-testworkflow-aborted
- end-testworkflow-canceled
- end-testworkflow-not-passed
Events for State Changes
It is possible to get notified by webhooks only when the latest execution's outcome differs from the previous one. This way you can see instantly when one of your scheduled tests was healed or when they got broken. It could also help prevent alert fatigue by deduplicating the alerts and therefore decreasing the load on your monitoring systems. Testkube supports special webhook event types to track changes between current and previous execution states.
For Test Workflows:
- become-testworkflow-up (from any error state to succeed one)
- become-testworkflow-down (from succeed state to any error one)
- become-testworkflow-failed (from any state to failed one)
- become-testworkflow-aborted (from any state to aborted one)
Supported Event Variables
Event-specific variables
Id- event ID (for example,2a20c7da-3b77-4ea9-a33d-403187d3e9e6)ResourceResourceIdType_- event Type (for example,start-testworkflow,end-testworkflow-success, etc. All available trigger events can be found in the Supported Event types section).TestWorkflowExecution- Test Workflow execution details (example: TestWorkflowExecution section)ClusterName- cluster nameEnvs(API-server ENV variables) - list of Testkube API-Server ENV variables
The full Event Data Model can be found here.
TestWorkflowExecution
Id- TestWorkflowExecution ID (for example,64f8d5b2712890925aea51dc)Name- TestWorkflow execution name (for example,wf-postman-smoke-tests-1)Namespace- TestWorkflowExecution namespace (for example,my-testkube)Number- TestWorkflowExecution sequence numberScheduledAt- TestWorkflow scheduled time (for example,2023-09-06 19:23:34.543433547 +0000 UTC)StatusAt- Time when the execution result's status has changed last time (for example,2023-09-06 19:23:42.221493031 +0000 UTC)Signature- Structured tree of TestWorkflow stepsResult- TestWorkflow execution resultOutput- Additional information from the steps, like referenced executed tests or artifactsReports- TestWorkflow reports generated from the steps, like junitWorkflow- TestWorkflow definitionResolvedWorkflow- TestWorkflow definition with resolved fields
The full TestWorkflowExecution data model can be found here.
TestWorkflow for TestWorkflowExecution Workflow and ResolvedWorkflow fields
Workflow.Name- TestWorkflow name (for example,wf-postman-smoke-tests)Workflow.Description- TestWorkflow description (for example,postman smoke tests to run after application deployment)
The full TestWorkflow data model can be found here.
TestWorkflowResult for TestWorkflowExecution Result field
Result.FinishedAt- TestWorkflow execution finished time(for example,2024-11-15 11:24:37.129 +0000 UTC)Result.Duration- TestWorkflow execution duration (for example,8.504s)Result.Status- TestWorkflow execution status (for example,passed)
The full TestWorkflowResult data model can be found here.
Additional Top-level Variables
ExecutionCommand- The CLI command to access the execution (example:kubectl testkube get execution 6679893e3b11f4e4900e17a5).ExecutionURL- The Dashboard URL to look at the execution (example:https://app.testkube.io/organization/tkcorg_9deb42dda2197657/environment/tkcenv_1145999f3c4d1115/dashboard/tests/git-zap-api-test/executions/6679893e3b11f4e4900e17a5).ArtifactCommand- The CLI command to access the artifacts (example:kubectl testkube get artifacts 6679893e3b11f4e4900e17a5).ArtifactURL- The Dashboard URL to look at the artifacts directly (example:https://app.testkube.io/organization/tkcorg_9deb42dda2197657/environment/tkcenv_1145999f3c4d1115/dashboard/tests/git-zap-api-test/executions/6679893e3b11f4e4900e17a5/artifacts).LogsCommand- The CLI command to access the logs (example:kubectl testkube get execution 6679893e3b11f4e4900e17a5 --logs-only).LogsURL- The Dashboard URL to look at the logs (example:https://app.testkube.io/organization/tkcorg_9deb42dda2197657/environment/tkcenv_1145999f3c4d1115/dashboard/tests/git-zap-api-test/executions/6679893e3b11f4e4900e17a5/log-output).
Make sure that the value testkube-api.dashboardUri in the helm-charts is set to app.testkube.io, or your remote Dashboard URL, so that the variables above can be populated with the correct values.
Payload Example
Here is Webhook JSON payload example
{
  "id": "2e2ffe66-0f13-4f0f-9fa3-1036e47916ba",
  "resource": "testworkflowexecution",
  "resourceId": "6835aabaecd4e4a1447e0287",
  "type": "end-testworkflow-success",
  "testWorkflowExecution": {
    "id": "6835aabaecd4e4a1447e0287",
    "groupId": "6835aabaecd4e4a1447e0287",
    "runnerId": "tkcroot_6fdb6bedebc61297",
    "runnerTarget": {},
    "runnerOriginalTarget": {},
    "name": "pytest-workflow-smoke-junit-success-only-133",
    "number": 133,
    "scheduledAt": "2025-05-27T12:06:18.446Z",
    "assignedAt": "2025-05-27T12:06:18.474Z",
    "statusAt": "2025-05-27T12:06:45.690926889Z",
    "signature": [
      {
        "ref": "rvcjww5",
        "category": "Clone Git repository"
      },
      {
        "ref": "rvc7j59",
        "name": "Run test",
        "children": [
          {
            "ref": "r4kzlmb",
            "category": "Run shell command"
          },
          {
            "ref": "r2v48sd",
            "category": "Upload artifacts"
          }
        ]
      }
    ],
    "result": {
      "status": "passed",
      "predictedStatus": "passed",
      "queuedAt": "2025-05-27T12:06:18.446Z",
      "startedAt": "2025-05-27T12:06:18.446Z",
      "finishedAt": "2025-05-27T12:06:45.690926889Z",
      "duration": "27.245s",
      "totalDuration": "27.245s",
      "durationMs": 27244,
      "pausedMs": 0,
      "totalDurationMs": 27244,
      "initialization": {
        "status": "passed",
        "queuedAt": "2025-05-27T12:06:18.446Z",
        "startedAt": "2025-05-27T12:06:19.371727926Z",
        "finishedAt": "2025-05-27T12:06:20.238548057Z"
      },
      "steps": {
        "r2v48sd": {
          "status": "passed",
          "queuedAt": "2025-05-27T12:06:45.448914778Z",
          "startedAt": "2025-05-27T12:06:45.449040908Z",
          "finishedAt": "2025-05-27T12:06:45.690926889Z"
        },
        "r4kzlmb": {
          "status": "passed",
          "queuedAt": "2025-05-27T12:06:21.188826191Z",
          "startedAt": "2025-05-27T12:06:23.730489947Z",
          "finishedAt": "2025-05-27T12:06:45.448914778Z"
        },
        "rvc7j59": {
          "status": "passed",
          "queuedAt": "2025-05-27T12:06:21.188826191Z",
          "startedAt": "2025-05-27T12:06:21.188848491Z",
          "finishedAt": "2025-05-27T12:06:45.690926889Z"
        },
        "rvcjww5": {
          "status": "passed",
          "queuedAt": "2025-05-27T12:06:20.238548057Z",
          "startedAt": "2025-05-27T12:06:20.239657977Z",
          "finishedAt": "2025-05-27T12:06:21.188826191Z"
        }
      }
    },
    "output": [
      {
        "ref": "tktw-init",
        "name": "pod",
        "value": {
          "agent": "0.0.0-SNAPSHOT-a467e28",
          "init": "",
          "name": "6835aabaecd4e4a1447e0287-zhfjg",
          "namespace": "enterprise-sandbox-webhook",
          "nodeName": "gke-testkube-cloud-edg-spot-node-pool-66738c92-hblm",
          "serviceAccountName": "testkube-api-server-tests-job",
          "toolkit": ""
        }
      }
    ],
    "reports": [
      {
        "ref": "r2v48sd",
        "kind": "junit",
        "file": "artifacts/pytest-report.xml",
        "summary": {
          "tests": 9,
          "passed": 9,
          "duration": 16009
        }
      }
    ],
    "workflow": {
      "name": "pytest-workflow-smoke-junit-success-only",
      "namespace": "enterprise-sandbox-webhook",
      "labels": {
        "argocd.argoproj.io/instance": "webhook-testkube-agent",
        "core-tests": "workflows",
        "tool": "pytest"
      },
      "annotations": {
        "kubectl.kubernetes.io/last-applied-configuration": "{\"apiVersion\":\"testworkflows.testkube.io/v1\",\"kind\":\"TestWorkflow\",\"metadata\":{\"annotations\":{},\"labels\":{\"argocd.argoproj.io/instance\":\"webhook-testkube-agent\",\"core-tests\":\"workflows\",\"tool\":\"pytest\"},\"name\":\"pytest-workflow-smoke-junit-success-only\",\"namespace\":\"enterprise-sandbox-webhook\"},\"spec\":{\"container\":{\"image\":\"python:3.12.6-alpine3.20\",\"resources\":{\"requests\":{\"cpu\":\"256m\",\"memory\":\"256Mi\"}},\"workingDir\":\"/data/repo/test/pytest/pytest-project\"},\"content\":{\"git\":{\"paths\":[\"test/pytest/pytest-project\"],\"revision\":\"main\",\"uri\":\"https://github.com/kubeshop/testkube\"}},\"job\":{\"activeDeadlineSeconds\":180},\"steps\":[{\"artifacts\":{\"paths\":[\"/data/artifacts/**\"]},\"name\":\"Run test\",\"shell\":\"pip install -r requirements.txt\\nmkdir /data/artifacts\\npytest tests/success --junit-xml=/data/artifacts/pytest-report.xml\\n\"}]}}\n"
      },
      "created": "2025-05-16T10:21:45Z",
      "updated": "2025-05-16T10:21:45Z",
      "spec": {
        "content": {
          "git": {
            "uri": "https://github.com/kubeshop/testkube",
            "revision": "main",
            "paths": [
              "test/pytest/pytest-project"
            ]
          }
        },
        "container": {
          "workingDir": {
            "value": "/data/repo/test/pytest/pytest-project"
          },
          "image": "python:3.12.6-alpine3.20",
          "resources": {
            "requests": {
              "cpu": "256m",
              "memory": "256Mi"
            }
          }
        },
        "job": {
          "activeDeadlineSeconds": {
            "value": 180
          }
        },
        "steps": [
          {
            "name": "Run test",
            "shell": "pip install -r requirements.txt\nmkdir /data/artifacts\npytest tests/success --junit-xml=/data/artifacts/pytest-report.xml\n",
            "artifacts": {
              "paths": [
                "/data/artifacts/**"
              ]
            }
          }
        ]
      }
    },
    "resolvedWorkflow": {
      "name": "pytest-workflow-smoke-junit-success-only",
      "namespace": "enterprise-sandbox-webhook",
      "labels": {
        "argocd.argoproj.io/instance": "webhook-testkube-agent",
        "core-tests": "workflows",
        "tool": "pytest"
      },
      "annotations": {
        "kubectl.kubernetes.io/last-applied-configuration": "{\"apiVersion\":\"testworkflows.testkube.io/v1\",\"kind\":\"TestWorkflow\",\"metadata\":{\"annotations\":{},\"labels\":{\"argocd.argoproj.io/instance\":\"webhook-testkube-agent\",\"core-tests\":\"workflows\",\"tool\":\"pytest\"},\"name\":\"pytest-workflow-smoke-junit-success-only\",\"namespace\":\"enterprise-sandbox-webhook\"},\"spec\":{\"container\":{\"image\":\"python:3.12.6-alpine3.20\",\"resources\":{\"requests\":{\"cpu\":\"256m\",\"memory\":\"256Mi\"}},\"workingDir\":\"/data/repo/test/pytest/pytest-project\"},\"content\":{\"git\":{\"paths\":[\"test/pytest/pytest-project\"],\"revision\":\"main\",\"uri\":\"https://github.com/kubeshop/testkube\"}},\"job\":{\"activeDeadlineSeconds\":180},\"steps\":[{\"artifacts\":{\"paths\":[\"/data/artifacts/**\"]},\"name\":\"Run test\",\"shell\":\"pip install -r requirements.txt\\nmkdir /data/artifacts\\npytest tests/success --junit-xml=/data/artifacts/pytest-report.xml\\n\"}]}}\n"
      },
      "created": "2025-05-16T10:21:45Z",
      "updated": "2025-05-16T10:21:45Z",
      "spec": {
        "content": {
          "git": {
            "uri": "https://github.com/kubeshop/testkube",
            "revision": "main",
            "paths": [
              "test/pytest/pytest-project"
            ]
          }
        },
        "container": {
          "workingDir": {
            "value": "/data/repo/test/pytest/pytest-project"
          },
          "image": "python:3.12.6-alpine3.20",
          "resources": {
            "requests": {
              "cpu": "256m",
              "memory": "256Mi"
            }
          }
        },
        "job": {
          "activeDeadlineSeconds": {
            "value": 180
          }
        },
        "steps": [
          {
            "name": "Run test",
            "shell": "pip install -r requirements.txt\nmkdir /data/artifacts\npytest tests/success --junit-xml=/data/artifacts/pytest-report.xml\n",
            "artifacts": {
              "paths": [
                "/data/artifacts/**"
              ]
            }
          }
        ]
      }
    },
    "runningContext": {
      "interface": {
        "type": "ui"
      },
      "actor": {
        "name": "admin@example.com",
        "email": "admin@example.com",
        "executionReference": "6835910fecd4e4a1447e023f",
        "type": "user"
      }
    }
  },
  "external": true
}
Webhook templates
In order to re-use the Webhook specification, you can define a special Testkube resource - WebhookTemplate.
It contains all the same fields as the Webhook resource, except webhookTemplateRef one, which is used for referencing a template in the webhook.
WebhookTemplate can be used only as a part of the calling Webhook. Its content is merged into the Webhook specification.
Check out the JIRA Integration document for a complete example of how to use WebhookTemplates with your Webhooks.
Simple WebhookTemplate example
Here is a simple WebhookTemplate
apiVersion: executor.testkube.io/v1
kind: WebhookTemplate
metadata:
  name: example-template
  namespace: testkube
spec:
  events:
  - end-testworkflow-success
  uri: https://webhook.site
And here comes a Webhook that uses ´webhookTemplateRef´ to refer to this template.
apiVersion: executor.testkube.io/v1
kind: Webhook
metadata:
  name: example-webhook
  namespace: testkube
spec:
  webhookTemplateRef:
    name: example-template
Managing WebhookTemplate Resources
Testkube WebhookTemplates are CRDs that must be created in the same Kubernetes namespace where your Testkube agent is running. While the Testkube dashboard does not expose these resources for management, you can access the corresponding Kubernetes namespace and work with them directly, there. Below are some commands for working with WebhookTemplate resources.
- List existing:
kubectl get webhooktemplates -n <namespace> - Create new:
kubectl apply -f <webhook-template-manifest-file>.yaml -n <namespace> - Edit one:
kubectl edit webhooktemplates <name-of-webhook-template> -n <namespace> - Delete:
kubectl delete webhooktemplates <name-of-webhook-template> -n <namespace>
Testing Webhooks
If you are just getting started and want to test your webhook configuration, you can use public and free services that act as HTTP catch-all apps. Here are a couple of options:
- Beeceptor: Beeceptor allows you to quickly capture HTTP payloads, review them in real time, and send desired HTTP responses as you test your webhooks. You can use its local-tunnel feature when you want to test payloads against a service running on localhost.
- Webhook.Site: Webhook.Site provides an easy way to capture HTTP payloads, review the headers and body for the incoming requests, and automatically respond with a
200 OKstatus code.
By using these services, you can quickly set up an HTTP endpoint to receive webhook payloads during your testing/development process.
URL Masking
In the “Organization Management” section, under the "Product Features" tab, there is an option called “Webhooks URL Masking.” When this toggle is enabled, the Testkube Dashboard will no longer display any settings/configuration related to Webhook URLs.

Disabling Webhooks
Disabling webhooks can be helpful to make sure your team does not get spammed with notifications during development. Testkube lets you disable them via the CLI, the API or modifying the CRD directly. By default, webhooks are enabled on creation.
- CLI
- API
- Custom Resource
The easiest way to operate on webhooks in Testkube is to use the official CLI.
Set on Creation
To disable:
testkube create webhook --disable --name "${WEBHOOK_NAME}" ...
To enable it explicitly:
testkube create webhook --disable=false --name "${WEBHOOK_NAME}" ...
Set on Update
To disable:
testkube update webhook --disable --name "${WEBHOOK_NAME}"
To enable:
testkube update webhook --disable=false --name "${WEBHOOK_NAME}"
When automating your operations on webhooks, you can also use the Testkube REST API. For more details, please consult the Testkube OpenAPI Definitions page.
The field specifying this on the webhooks is called disabled and is expecting a value of type boolean.
Keep in mind, that enabling the webhook again from the API will require specifying "disabled":false, simply deleting the field from the object is interpreted as not setting any value on it.
Using the webhook from the example in creation, you can add the field disabled set to "true" to the specification:
apiVersion: executor.testkube.io/v1
kind: Webhook
metadata:
  name: example-webhook
  namespace: testkube
spec:
  uri: <YOUR_ENDPOINT_URL>
  events:
    - start-testworkflow
    - end-testworkflow-success
    - end-testworkflow-failed
  selector: ""
  disabled: "true"
Apply with:
kubectl apply -f webhook.yaml
To enable a webhook again, you can either set the field disabled to "false" explicitly, or delete it altogether from the specification.
Disabling for Workflow Executions
Disabling webhooks can also be done directly when executing a TestWorkflow. This way the notifications can be disabled temporarily
during running the execution. The CLI offers the flag --disable-webhooks, the API the parameter disableWebhooks. When not set
explicitly, webhooks will be enabled by default.
- CLI
- API
Use the flag --disable-webhooks on the CLI:
testkube run testworkflow test-workflow --disable-webhooks
The API expects the following object set under the spec attribute:
{
  "disableWebhooks": true
}
The examples show only the create operations, however, these instructions work the same for update and run as well.
- CLI
- API
- Custom Resource
testkube update webhook --name example-webhook
{
  "name": "example-webhook",
  "namespace": "testkube",
  "uri": "https://webhook.url/",
  "events": ["start-testworkflow", "end-testworkflow-success", "end-testworkflow-failed"],
  "disabled": false
}
apiVersion: executor.testkube.io/v1
kind: Webhook
metadata:
  name: example-webhook-enabled
  namespace: testkube
spec:
  events:
    - start-testworkflow
    - end-testworkflow-success
    - end-testworkflow-failed
  uri: https://webhook.url/
You can also use Silent Executions to disable Webhooks for a specific Workflow execution.