cURL
Testkube is able to run cURL commands as tests.
Default command for this executor: curl
Default arguments for this executor command: -is
See more at "Redefining the Prebuilt Executor Command and Arguments" on the Creating Test page.
Abstraction over cURL
Testkube executor provides an abstraction over cURL that allow you to create JSON-based cURL test files. They allow you to combine a cURL command with expected results:
expected_statusallows you to assert that a specific status code is returned.expected_bodyallows you to validate the body of the response.
Below is an example of how to format the test:
{
  "command": [
    "curl",
    "https://jsonplaceholder.typicode.com/todos/1",
    "-H",
    "'Accept: application/json'"
  ],
  "expected_status": "200"
}
You can also find this test in the Testkube repository: https://github.com/kubeshop/testkube/blob/main/test/curl/curl.json.
Example Test
In this example we will use the following cURL test: https://github.com/kubeshop/testkube/blob/main/test/curl/curl-smoke-test.json.
{
  "command": ["curl", "https://jsonplaceholder.typicode.com/todos/1"],
  "expected_status": "200"
}
Creating and Running a Test
- Dashboard
- CLI
- Custom Resource
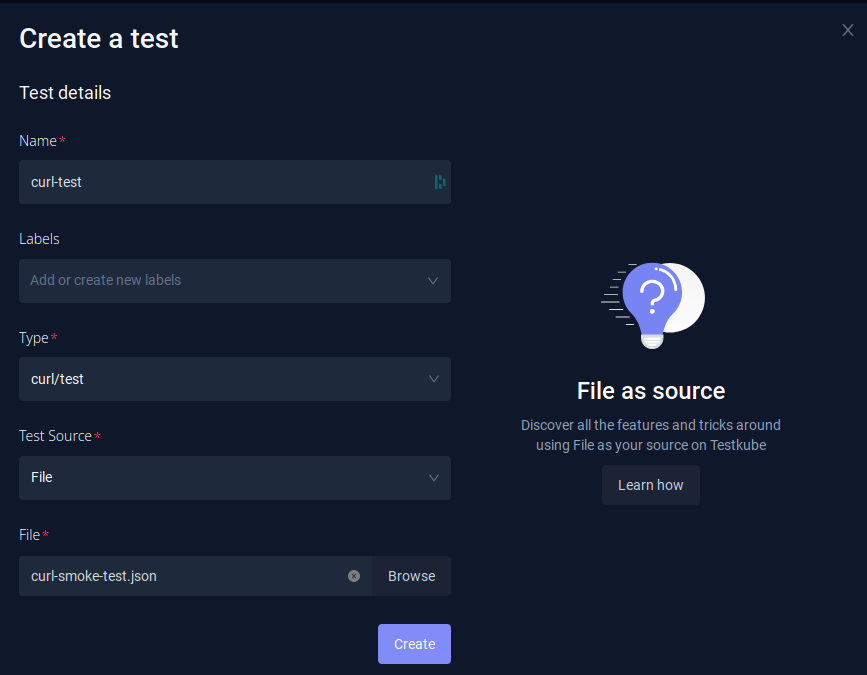
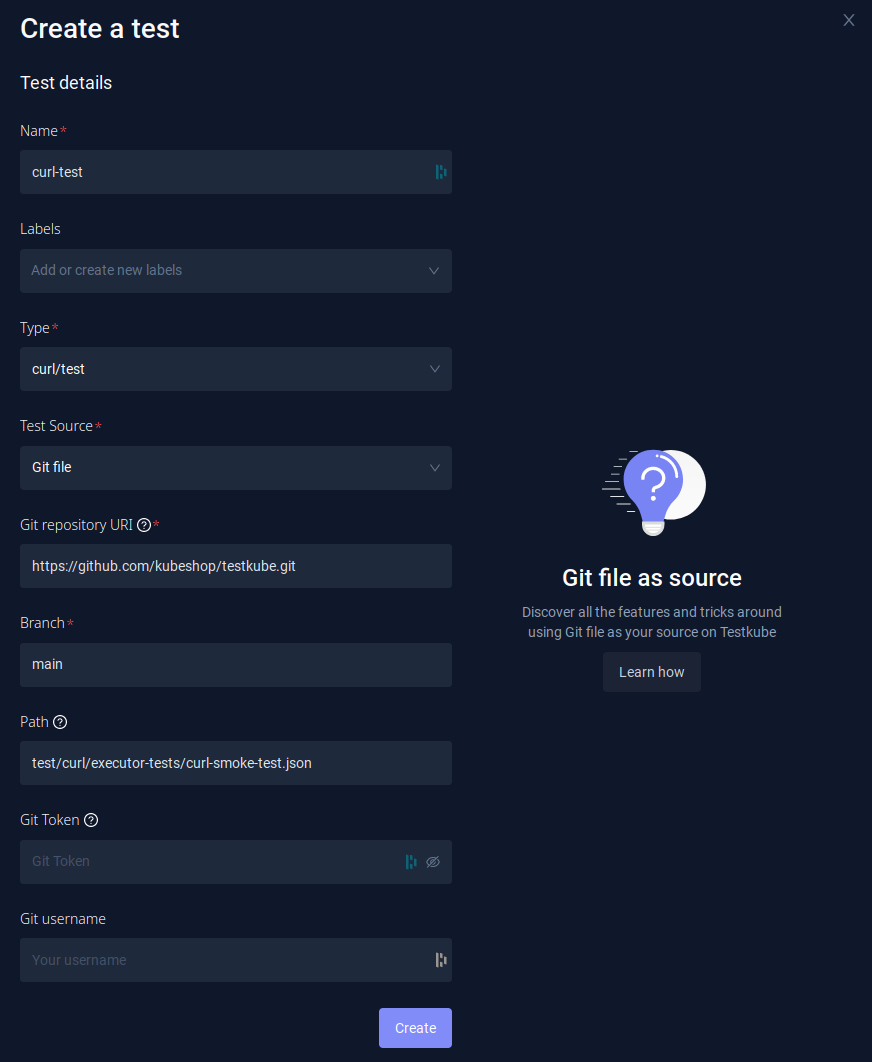
If you prefer to use the Dashboard, just go to Tests, and click the Add a new test button. Fill in the Test Name, choose the Test Type (curl/test), and then choose Test Source.
File
For a File source, the test file is uploaded directly.
Git File
For a Git file, you need to fill in the repository details - Git repository URI (in this case https://github.com/kubeshop/testkube.git), branch (main), and the path to the cURL test in your repository (test/curl/curl-smoke-test.json). In this example, the repository is public, but in the case of private ones, you would need to additionally fill in the Git credentials.
If you prefer using the CLI, you can create the test with testkube create test.
You need to set:
--name(for example,curl-test)--type(in this casecurl/test)
And, then choose the Test Content type based on the Test Source you want to use:
File
For a File test source:
--test-content-type(file-uri)--file(path to your curl test - in this casetest/curl/curl-smoke-test.json)
testkube create test --name curl-test --type curl/test --file test/curl/curl-smoke-test.json
Test created testkube / curl-test 🥇
You can then run the test with testkube run test curl-test.
Git File
--test-content-type(git-file, so specific file will be checked out from the Git repository)--git-uri- Repository URI (in case of this example,https://github.com/kubeshop/testkube.git).--git-branch--git-path- Path to the k6 script in the repository (in this casetest/curl/curl-smoke-test.json).
testkube create test --name curl-test --type curl/test --test-content-type git-file --git-uri https://github.com/kubeshop/testkube.git --git-branch main --git-path test/curl/curl-smoke-test.json
Test created testkube / curl-test 🥇
You can then run the test with testkube run test curl-test.
$ testkube run test curl-test
Type:              curl/test
Name:              curl-test
Execution ID:      6400870d237c189271627cfa
Execution name:    curl-test-1
Execution number:  1
Status:            running
Start time:        2023-03-02 11:22:53.0107448 +0000 UTC
End time:          0001-01-01 00:00:00 +0000 UTC
Duration:


Test execution started
Watch test execution until complete:
$ kubectl testkube watch execution curl-test-1


Use following command to get test execution details:
$ kubectl testkube get execution curl-test-1
You can then watch the execution, or get the results after the execution is finished.
ID:         6400870d237c189271627cfa
Name:       curl-test-1
Number:            1
Test name:         curl-test
Type:              curl/test
Status:            passed
Start time:        2023-03-02 11:22:53.01 +0000 UTC
End time:          2023-03-02 11:23:02.472 +0000 UTC
Duration:          00:00:09
Repository parameters:
  Branch:          main
  Commit:
  Path:            test/curl/curl-smoke-test.json
  Working dir:
  Certificate:

running test [6400870d237c189271627cfa]
🚚 Initializing...
🌍 Reading environment variables...
✅ Environment variables read successfully
RUNNER_ENDPOINT="testkube-minio-service-testkube:9000"
RUNNER_ACCESSKEYID="********"
RUNNER_SECRETACCESSKEY="********"
RUNNER_REGION=""
RUNNER_TOKEN=""
RUNNER_BUCKET="testkube-artifacts"
RUNNER_SSL=false
RUNNER_SCRAPPERENABLED="true"
RUNNER_GITUSERNAME=""
RUNNER_GITTOKEN=""
RUNNER_DATADIR="/data"
📦 Fetching test content from git-file...
✅ Test content fetched to path /data/repo/test/curl/curl-smoke-test.json
📂 Fetching uploads from object store testkube-minio-service-testkube:9000...
📂 Placing files from buckets into /data/uploads/ []
📂 Getting the contents of bucket folders [test-curl-test]

📂 Setting up access to files in /data
🔬 Executing in directory /data:
 $ chmod
✅ Execution succeeded
✅ Access to files enabled
✅ Initialization successful
0xc000f641f0
🚚 Preparing test runner
🌍 Reading environment variables...
✅ Environment variables read successfully
RUNNER_ENDPOINT="testkube-minio-service-testkube:9000"
RUNNER_ACCESSKEYID="********"
RUNNER_SECRETACCESSKEY="********"
RUNNER_REGION=""
RUNNER_TOKEN=""
RUNNER_BUCKET="testkube-artifacts"
RUNNER_SSL=false
RUNNER_SCRAPPERENABLED="true"
RUNNER_GITUSERNAME=""
RUNNER_GITTOKEN=""
RUNNER_DATADIR="/data"
running test [6400870d237c189271627cfa]
🚚 Preparing for test run
📦 Fetching test content from git-file...
✅ Test content fetched to path /tmp/git-checkout2214379061/repo/test/curl/curl-smoke-test.json
🔑 Filling in the input templates
✅ Successfully filled the input templates
🔬 Executing in directory :
 $ curl -is https://testkube.io/
HTTP/2 200
date: Thu, 02 Mar 2023 11:22:59 GMT
content-type: text/html
// ... output skipped

Test execution completed with success in 9.462s 🥇
The third option for creating the Test is to use a Test CRD. If you already have the test created, you can check the definition in the Dashboard (Definition tab in Test Settings).
You can also get a definition while using the testkube create test command by adding --crd-only.
In that case, the test won't be created but the definition will be displayed.
testkube create test --name curl-test --type curl/test --test-content-type git-file --git-uri https://github.com/kubeshop/testkube.git --git-branch main --git-path test/curl/curl-smoke-test.json --crd-only
apiVersion: tests.testkube.io/v3
kind: Test
metadata:
  name: curl-executor-smoke
  namespace: testkube
  labels:
    core-tests: executors
spec:
  type: curl/test
  content:
    type: git-file
    repository:
      type: git-file
      uri: https://github.com/kubeshop/testkube.git
      branch: main
      path: test/curl/curl-smoke-test.json
When the Test CRD is saved to the yaml file, it can then be applied directly with kubectl apply -f SOME_FILE_NAME.yaml.