Testkube Control Plane MCP Endpoint
The Testkube Control Plane provides an MCP endpoint that allows you to connect directly to Testkube without running a local MCP server. This is the recommended approach for most users.
This is the easiest way to get started with the Testkube MCP Server - no local installation required!
Why Use the Control Plane MCP Endpoint?
- No local setup - No need to install the Testkube CLI or Docker
- Remote access - Connect to Testkube from any location without local setup
- Always available - The endpoint is always running and accessible
- Simplified deployment - No need to manage a local MCP server process
- Centralized configuration - Manage authentication and permissions through the Control Plane
- Team collaboration - Multiple users can connect to the same endpoint
- Automatic updates - Control Plane updates are handled automatically
- Consistent performance - Leverages the Control Plane's infrastructure
Prerequisites
- Access to a Testkube Environment - You need an active Testkube organization and environment
- An AI tool that supports MCP - Such as Claude Code, VS Code with GitHub Copilot, Cursor, or Claude Desktop
Authentication
The hosted MCP endpoint supports two authentication methods:
OAuth (Recommended)
OAuth lets MCP clients authenticate through your browser — no tokens to create or manage. Your MCP client handles discovery and authentication automatically. You just see a browser popup to log in.
This is the recommended approach for individual users because:
- No API keys to create, copy, or rotate
- Per-user identity for seat tracking and audit trails
- Works with your existing SSO provider (Google, GitHub, SAML, etc.)
API Token
API tokens are better for automation, CI/CD, or shared environments where browser login isn't practical. See Obtaining an API Token below.
Endpoint URL Structure
The Control Plane MCP endpoint follows this URL pattern:
https://api.testkube.io/organizations/{organization_id}/environments/{environment_id}/mcp
Replace:
{organization_id}with your Testkube organization ID (e.g.,tkcorg_076487a004a7f6fb){environment_id}with your environment ID (e.g.,tkcenv_d19e797ff2c1449b)
You can find your organization and environment IDs in the Testkube Dashboard URL or by running:
testkube get context
Configuration with OAuth
With OAuth, you just provide the endpoint URL. No headers, no tokens — your MCP client handles authentication automatically via a browser login.
Claude Code
Adding the server and authenticating are two separate steps.
1. Register the server. This only saves the configuration — it does not authenticate:
claude mcp add --transport http testkube https://api.testkube.io/organizations/{organization_id}/environments/{environment_id}/mcp
2. Check the status. Running claude mcp list shows the server as Needs authentication:
claude mcp list
# testkube: https://api.testkube.io/organizations/.../mcp (HTTP) - ! Needs authentication
Needs authentication is expectedThis status is not an error. claude mcp add only registers the endpoint — it does not sign you in. The endpoint correctly responds that a login is required, and Claude Code surfaces that as Needs authentication until you complete the next step.
3. Authenticate. Start Claude Code, then open the MCP manager and sign in:
claude
Inside the session, run /mcp, select testkube, choose Authenticate, and complete the login in the browser window that opens. Claude Code stores the token, so you won't need to repeat this in future sessions.
4. Confirm. Back in Claude Code, the server status changes to connected and the Testkube tools become available. You can verify any time with /mcp.
VS Code (GitHub Copilot)
Add to your MCP settings (~/Library/Application Support/Code/User/mcp.json on macOS):
{
  "servers": {
    "testkube": {
      "type": "http",
      "url": "https://api.testkube.io/organizations/{organization_id}/environments/{environment_id}/mcp"
    }
  }
}
Cursor / Claude Desktop
These clients also support OAuth automatically. Add a remote MCP server with the endpoint URL — the client will handle the OAuth flow.
Configuration with API Token
If you prefer API tokens (for automation or shared environments), provide the token in the headers:
{
  "mcpServers": {
    "testkube": {
      "url": "https://api.testkube.io/organizations/{organization_id}/environments/{environment_id}/mcp",
      "transport": {
        "type": "sse"
      },
      "headers": {
        "Authorization": "Bearer YOUR_API_TOKEN_HERE"
      }
    }
  }
}
Replace:
{organization_id}with your actual organization ID{environment_id}with your actual environment IDYOUR_API_TOKEN_HEREwith your Testkube API token
Obtaining an API Token
- Log in to your Testkube Dashboard
- Navigate to Organization Settings → API Tokens
- Create a new API token with appropriate permissions
- Copy the generated API token (you won't be able to see it again)
See API Token Management for more details.
Control Plane Endpoint in the Testkube Dashboard
The Testkube Dashboard provides convenient access to the Control Plane MCP endpoint for your Testkube Environments together with configuration examples for common IDEs, simply navigate to the Environment Settings page and select the MCP Server option:
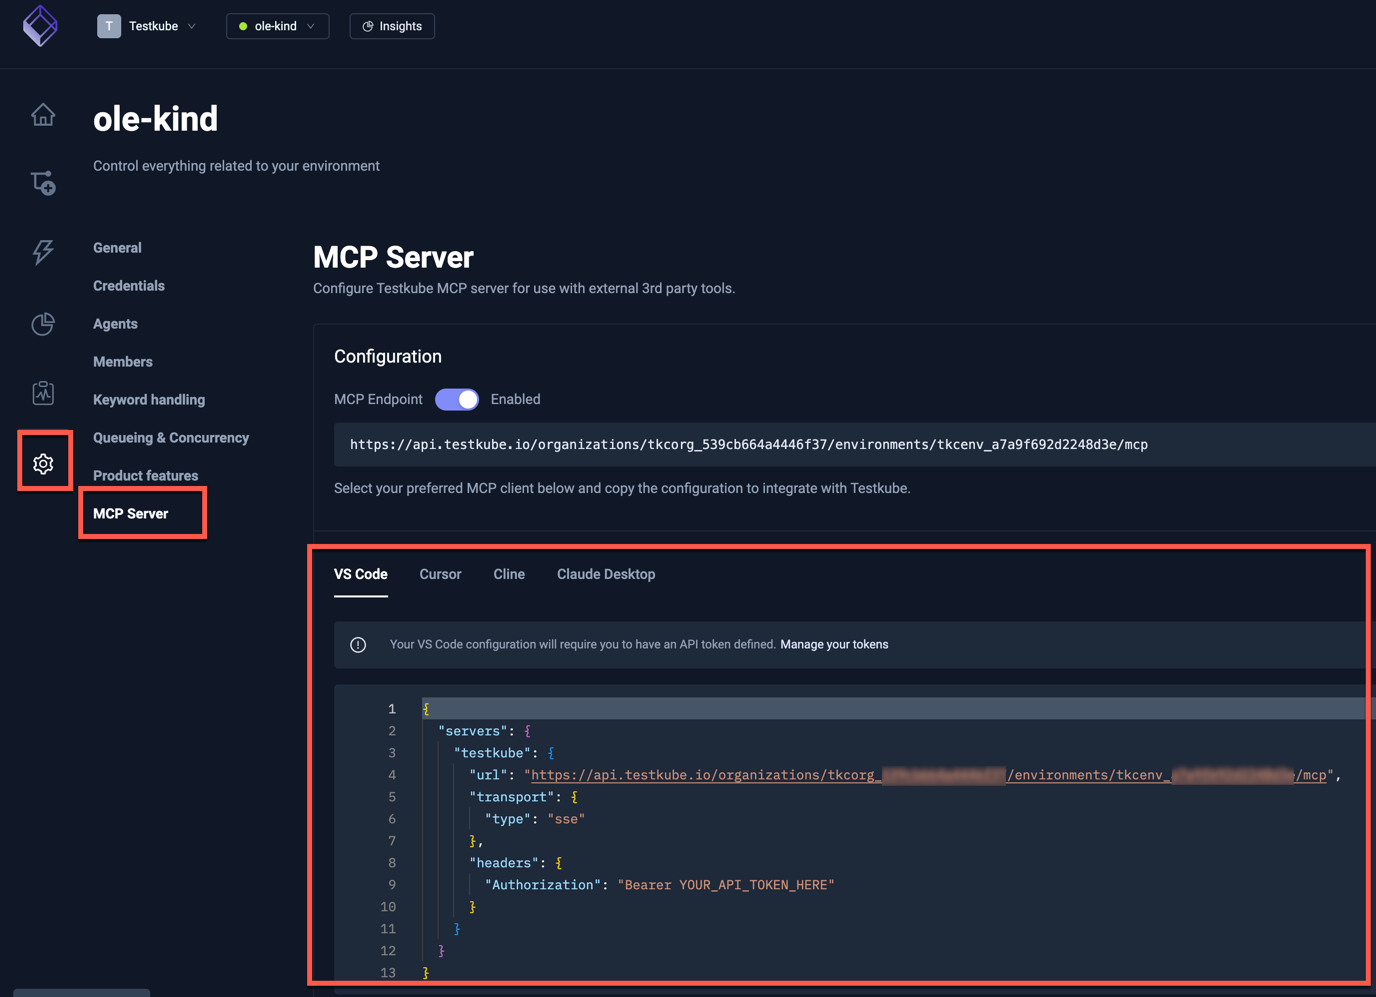
The MCP endpoint feature shown in the screenshots above is enabled by default in Testkube Cloud.
For self-hosted installations, you must enable this feature in your Helm configuration (see below) before the MCP Server settings tab and endpoint become available.
Enabling MCP for Self-Hosted Deployments
For self-hosted Testkube Enterprise installations, the MCP endpoint is disabled by default. You must enable it via Helm configuration before it becomes available.
Step 1: Enable MCP in Helm Configuration
Add the following environment variables to your Helm values file:
testkube-cloud-api:
  additionalEnvVars:
    - name: MCP_ENABLED
      value: "true"

testkube-cloud-ui:
  additionalEnv:
    MCP_ENABLED: true
Step 2: Register the OAuth Callback in Dex
To enable OAuth authentication for the MCP endpoint, add the MCP OAuth callback URL to your Dex configuration's redirectURIs for the testkube-enterprise client:
- "https://your-api-domain.example.com/mcp/auth/callback"
Step 3: Enable MCP per Environment
After deploying with MCP enabled, you need to enable it for each environment:
- Log in to your Testkube Dashboard
- Navigate to Environment Settings → MCP Server
- Toggle the MCP Endpoint switch to "Enabled"
- Copy the configuration for your preferred IDE
Step 4: Configure Your AI Tool
For self-hosted instances, use your custom control plane URL:
If your control plane or connected MCP integrations rely on certificates signed by a private CA, configure trust using Using a private certificate authority (CA).
With OAuth (recommended):
{
  "servers": {
    "testkube": {
      "type": "http",
      "url": "https://your-control-plane.example.com/organizations/{organization_id}/environments/{environment_id}/mcp"
    }
  }
}
With API Token:
{
  "mcpServers": {
    "testkube": {
      "url": "https://your-control-plane.example.com/organizations/{organization_id}/environments/{environment_id}/mcp",
      "transport": {
        "type": "sse"
      },
      "headers": {
        "Authorization": "Bearer YOUR_API_TOKEN_HERE"
      }
    }
  }
}
Replace your-control-plane.example.com with your self-hosted control plane domain, and use your actual organization ID, environment ID, and API token.